Thursday, September 25, 2008

9-20-08 through 9-25-08

9-20-08 through 9-23-08
I’ve gotten most of the ancillary components stripped out of the engine bay except for the intake and exhaust manifolds which are coming off tonight. I pulled the water pump out and I’m still debating on replacing it with a new one or keeping the one I have now. It only has about 40-k miles on it and seems ok…I’ll have to think about this some more. I also pulled the distributor out and boxed it up for rebuild. I’m going to send it to THE distributor guy I know from the MG forum and have him make it all happy and new and set me up for a conversion to electronic ignition.


I degreased and sanded down the extreme forward part of the engine bay including the hood locking platform. I put a layer of etching primer and then a layer of gray primer and then I painted the area with Krylon gloss white paint. The finish looks great which it always does if you take the time to properly prepared before spraying. I am so tempted to paint the entire car that way. I’ve done it before and if you prep it right and know how to wet sand properly, it comes out looking just as good as a mid-priced paintjob. But, since there is no hardener in spray paint, I’m gonna avoid that temptation. I’m going to get a spray gun and real paint and do it right.


After I pull the intake and exhaust manifolds off I’ll clean the intake up and wire brush the hell out of the exhaust manifold. That will be followed by a few coats of gloss black high-temp paint. I use the brake caliper paint instead of the engine paint because it seems to hold up better to the temperatures experienced by the exhaust manifold.

After one more cleaning and a final pressure washing, I’ll finish out the engine bay by painting the engine block and then prepping, priming and painting the inner fender wells and firewall. I’ll also be pulling the valve cover and smaller tubes and brackets to sandblast and paint them. I need to run to Sears to get a new tip for the sandblaster and more blasting media so I can start cleaning up all the parts I have that need a good blasting.

I haven’t gotten the heater box all the way out yet but the front panel is off and the heater core is finally out While cleaning it up, I discovered that it has a leak on one of the edges. Hopefully it can be repaired since a new one will cost upwards of $100.00.

9-21-08
I also found a replacement for the throttle and choke securing plate from one of the people on the MG forum. He lives about 30 minutes away and he only wants $20.00 for it so I’ll take that deal. It’ll be much easier to replace the old bracket than to drill out the broken screw and retap it.

9-22-08
The oil cooler is out and I sprayed out the inside of it with carb cleaner. I then filled it up with more carb cleaner and hooked one of the oil cooler lines that I pulled out of the engine bay to the cooler. I looped it around so that both ends of the hose are connected to the two cooler ports. I move the cooler around and shake it up from time to time to let the carb cleaner soak and break down the gunk in there. After a few days, I’ll drain it out and repeat the process a few more times to make sure it is nice and clean on the inside.

9-23-08
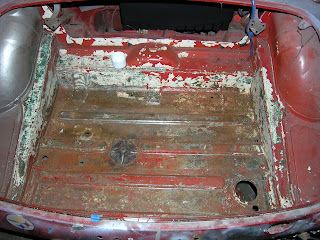
I got the rear cockpit (bulkhead, rear deck and inner wheel arches) painted today with the good old Krylon spray can paint but it turned out great. Nice gloss, good coverage…its all in how you prep what you are painting.


I looked into the prices of all the little stickers that go into the car (you know, the valve cover and air cleaner stickers, the emissions stickers, the negative earth sticker, etc) and, while they don’t cost that much, when you buy a bunch of them at once it really gets expensive. Since I had no desire to spend $40-$60 on some stickers I opened my Canvas-9 illustration program and drew up a bunch of them. It took about a half an hour and they really look good. I’m gonna print them up as both water-slide decals and stickers, the decals going on the parts that don’t get really hot (like the bonnet platform and battery bay) and the stickers going to the hotter places (like the valve covers.) I figure I’ll have about $3.00 cost in all of the stickers and about an hour’s worth of work (the time it took to create them and the time it will take to print them up and cut them out) Not too bad, especially if you’re a cheapskate like me.

9-24-08
I got the fiberglass laid on the rust holes over the driver side floorboards. It looks pretty good and has cured well. I may or may not put down another layer over it. I’m gonna stand on it and see how strong it feels, if it doesn’t seem strong enough then I’ll put down another layer. If not, I’ll move on to the passenger side floorboards and do the fiberglass there. When the floorboards are finished to my satisfaction I’m going to go ahead and spray the Dupli-color truck bed liner. In the few weeks that the floorboards have been sitting with just the primer on them I already see some rust forming so I need to get them cleaned up and sprayed as soon as possible. Then I’ll finish up the rest of the cockpit, spray it with truck bed liner and then get it painted all nice and purrrrrdy.


You may have noticed that I still haven’t pulled the dashboard off of the car yet though I‘ve been saying that I will for weeks now. Yes, I keep putting it off because I know it will be a giant pain in the ass. I’m hoping that my father-in-law brings back his pressure washer in the next day or two so that I can do the final engine bay, suspension and undercarriage cleaning rather than pulling off the dashboard. I figure that if I keep writing that I’m going to pull the dash, it will be LIKE pulling the dash. And, of course, spending the time talking and writing about it takes up the time I would use for actually pulling it…I do so love avoiding unpleasant things.


9-25-08
So I’ve been trying to figure out how much time I have to spend working on the B between now and June. Like most people I have a busy life and I was beginning to wonder if I’d be able to get her done by my target date of June 2nd. Then I did some math. If I only work on the B for 1 hour per day, five days a week between now and June it adds up to over 200 hours total. It might not sound like a lot but I estimate it will only take about 50 actual hours to do the body work. Even if I’m wrong and it takes 100 hours to do the body work, that still leaves over 100 hours to do everything else. Of course, I forget that me adjusting the carburetors myself will probably take about 200 hours so maybe I should increase my estimated time to finish the car.
And, as always, the problem isn’t the time, it’s the money.

Your thought for today…
“I’d rather push my MG than drive a Miata.”

Friday, September 19, 2008

9-12-08 through 9-19-08

9-12-08 through 9-14-08

Began working on the engine bay. I pulled the radiator and oil cooler and I’m letting the oil cooler lines sit for a few days to drain as much old oil out as possible. When they have, I’ll pull off the long line at the back of the block and then loop the one attached to the oil filter assembly back to the long hose’s rear oil cooler port.

I’ll be taking the radiator to the shop to get it flushed and pressure tested. If it is bad I’ll have them re-core it instead of replacing it with a new unit. There have been quality issues with new, non-British made radiators but I really can’t afford to get one from the UK. When the radiator goes into the shop I’ll also be taking the fuel tank in to, first of all, see if it is still usable and, if it is, to have it cleaned out.

The oil cooler I’ll clean out myself with carb cleaner, acetone and boiling water (but not all at the same time) I’ll do the same with the oil cooler lines so that they can be used when the engine gets finished and restarted. When the car goes into service I’ll be replacing the lines with the stainless steel braided hoses.

To clean the cooler I’ll first immerse it in a pot of near-boiling water and let is soak to loosen up the old oil and sludge in the unit. Then I’ll drain it and shoot carb cleaner into it, shake it around a bunch and run some small bushes in it as best I can. I’ll do that a few times then flush it a few times with acetone and that should clean it out pretty well. Sounds complicated but each step only takes a few minutes and its really pretty easy.

I found a used grill on an MGB forum. A nice chap in Canada only wants $40.00 for it so I will take that deal as it sure beats nearly $200.00 for a new reproduction grill. It has a few minor bends in it but I can straighten those and buff it and it will look nearly new.

9-14-08
I’m planning out my next steps for cleaning up the engine bay. I tend to work on the car from several angles at the same time. While I’m cleaning up the cockpit and trunk I’m also pulling parts from the engine, cleaning the engine bay, etc. that way I’m less likely to get bored and just say to hell with working on the car today.

The first thing I need to do is roll the car outside and take the pressure washer to it. I’ve already done a lot of degreasing in the engine bay but the pressure washer will take off any of the remaining gunk and crud. I’ll also be pressure washing the suspension and the whole underside of the car.

I’m going to be pulling off and boxing up a lot of the ancillary items from the engine. The carbs and heat shields are coming off too so I can send the SU’s to my British car guru to rebuild for me. I’ll be pulling the alternator (to get it tested) and also the water pump. I’m not sure if I’m going to replace the water pump as it was only 5 years old when the B was parked but it has set for 10 years and I’m not sure I want to trust it when the car is back on the road.

The heater box will come off to be cleaned up and painted. I’ll also take the heater core to the shop for cleaning and pressure testing when I take the radiator and fuel tank in. I’m considering replacing the heater fan assembly with a more modern, 3-speed unit. Not sure yet if I’m going to be that ambitious but the current 2-speed fan (slow and off) just doesn’t cut it.

The exhaust and intake manifolds are also coming off to be cleaned and painted along with the two side covers on the driver‘s side of the engine. When all this stuff is off the engine it will be a lot easier to clean up and paint both the engine and the engine bay. The engine, of course, will be painted with high-temp black gloss paint. The engine bay and inner valances will be stripped of electrical and hydraulic components cleaned, paint-stripped then primered and painted. I’ll use a spray can for priming and painting the engine bay. If prepped right it yields very good results.
I’ll hopefully be doing more working on the car than writing about it over the next few weeks. I may not post as often but I’ll get pictures up frequently. We had our first colds night here in the Carolinas this week (cold for the Carolinas, at least) so I want to get as much work knocked out while it is still relatively mild outside.


The fall is the absolute best time to drive an MGB…it is also the best time to work on one.

9-15-08
The carbs are off. I’m going to clean them off with carb cleaner and send them off to Butch in Burlington to rebuild. (I don’t like to send dirty greasy parts out for repair…just seems rude)
Unfortunately, the little set screw that holds the accelerator cable in place, the plate that is bolted to the top of the carb heat shield, is broken off so the only way to pull the cable is to cut it off. I was planning to replace it anyway but that plate with the set screw is no longer available so I’m either gonna have to find a used one or find a way to fix the old one.

Started pulling the heater box out…it’s a bitch! If its this hard to get the heater box out, I can’t imagine the hell it will be to get it back in…much fun awaits, methinks.

9-16-08
I pulled off the alternator but I’m not sure I’m going to use it. There is a fairly simple Bosch or Delco conversion that I may do since the Lucas alternator is rather lacking in certain areas. It works fine at speed but at idle it barely puts out enough and with the greater electrical demands from new stereo systems and other electrical equipment that will be in the car, an upgrade is probably warranted.

9-16-08
I sprayed the engine and engine bay with foaming degreaser and let it soak. I’ll do that again before I whip out the pressure cleaner and clean up the entire drive train and underside of the car. I also hate working on a dirty, greasy car. You’re gonna get dirty no matter what but 10 years worth of big grease globs and road funk I can do without.

9-18-08
After I get the car all pressure washed and dried off this weekend I’m gonna start back to work on cleaning out and stripping the cockpit and glassing the rust holes. Then I think I’m gonna whip out the sand blaster and start cleaning up all of the various odds and ends that need blasted and painted. Things like the wheels, suspension, air cleaner pots, radiator surround panel, you know…just about everything. Then (unless the budget allows for me to purchase that MiG welder to do the rockers) the dashboard gets pulled.

As a side note, I’ve decided that I’m going with the new LED lighting systems where ever possible. The taillights, side marker lamps, dash and instrumentation lights will all be the LED lamps. They have a much, much, much lower current draw and a lifetime of at least 25,000 hours. The back up lights, however, will be halogen lamps. I took the old back up light bezels, cut out the insides and drilled a mounting for a small 12-volt halogen lamp. It puts out a lot more light than the original incandescent…I’m just afraid of melting the lenses!

9-19-08
Rolled the car outside today and sprayed off the grease from the engine compartment and engine. still have more to do. Just found out the pressure washer won't be available until next week so I'll have to wait for the final cleaning until then.

Pulled out the heater core and was cleaning it out when I noticed it had a small hole in it. when I take it in for professional cleaning and pressure testing I'll find out if it is reparable. If not, its another $100.00 or so that I didn't want to spend.

Wednesday, August 20, 2008

And so it begins...all over again!

This will chronicle my efforts to restore my 1974 MGB. I originally purchased the car in 1988 for $850.00. It barely ran, had no interior save the seats and dashboard and was painted in at least three different shades of primer. But everybody instantly fell in love with “The B.”


Above: The MGB in 1988 the day I bought her

My first restoration began in early 1989. A friend of mine (who recommended that I buy the car in the first place) found an MGB engine at a local machine shop which had been stripped, cleaned and bored .40” over. It had new competition pistons, rings and cam shaft and a ton of other goodies. It had about $400.00 worth of work and (at the time) about $500.00 worth of new parts and the machine shop only wanted $150.00 for all of it since the owner had never come back to claim it. If you think that deal didn’t get jumped on, you’d be wrong.

I bought the silica bronze hardened valve seals so the engine could run on unleaded gas, had the shop completely rework the head and valve assembly and started to work putting it all back together. I had never rebuilt an engine from scratch but with my trusty Haynes manual, it was actually a fairly straightforward procedure. When I was finished, I only had two washers and one bolt left over so I figured that was pretty good!

Being a still rather young man, I couldn’t afford to have the very rough body of the B done by an auto repair shop so I did what any other idiot would have done in my place: I got a job at body shop. I’d work on other peoples’ cars during the day and my car at night. When the body was finished The painter at the shop sprayed a Dupont base coat/clear coat Corvette flame red paintjob for me and I began putting it all back together.


Left: The MGB in 1989

Once it was all back together with the addition of new carpet, panel kit and tan top, the MGB looked pretty damned good! I drove that car for 10 years as my daily driver, rain or shine, hot or cold and I drove it everywhere. All over the east coast of the USA. On vacations. To work. Everywhere. Unfortunately, I had done patch and fill when I did the bodywork so after 10 years, the sills, doglegs and door skins were pretty much Swiss cheese. Mechanically it was fine but the body was just too rough to keep her on the road.

So, in the fall of 1998, the MGB went into the back of my garage and she was replaced by a 1995 Corvette. I thought after two years or so I would finish up restoring the B and she’d be back on the road again in no time at all. But home improvements, vacations, work and the birth of my son got in the way of that and she sat in the back of the garage for 10 years. I did do some work on her during that time. I stripped off the hood, trunk, doors front fenders, top and interior. I also stripped out most of the other things that I could except for the engine and drive train, electricals, hydraulics and suspension. I also ordered a fair number of parts that I’d need during the restoration, including new outer sills, doglegs and a bunch of the other body parts that would need to be replaced. They all sat for quite a few years too.

Well time passes and things change as they always do and I found myself a divorced man who moved 40 miles away from the home I lived in for nearly a decade. Well, a move, getting remarried, another move, more house remodeling, two new kids and a bunch of other things got in the way of the MGB restore. But finally, in July of 2008, I trailered the B to my new garage and began the real work of bringing her back to her full glory.

Here is the story as it unfolds.

Bringing you up to speed

7-28-08
Got a trailer from U-haul and Steven, my father in law, and his ginormous Chevy pickup and drove to Greensboro to get the B from the ex wife’s garage. I decided on the car trailer instead of the tow dolly since the tires on the B were 15 years old and didn’t want to seem to hold air for very long.

Aired up the tires and she wheeled right up on the trailer with no trouble at all. Got most of the body parts and tied them, along with the front fenders, onto the car. Very classy, driving down the road with a car that has the fenders held on by ropes.
Got it home and rolled it right into the garage ass first (the car, not me)

8-6-08
Started tearing off the passenger side outer sills.

Luckily, the inner sills are still sound with just one little spot of rust-through right at the forward end of the sill. That will be easy to cut out and replace.


Still going through boxes of new parts and old ones pulled from the car. I’m doing all the easy to do work first (and the easy but sucky work too)

Cleaned out the cockpit floorboards, the driver side has a few small spots of rust-through but not too bad. The passenger side only had on small rust hole so both sides should be easy enough to take care of with some fiberglass.


Cleaned and undercoated the front wheel well areas. They were in perfect shape so no need for real work there.


The cockpit and trunk are going to be a total bitch to bring down to bare metal. Both have four layers of paint and primer on them and the cockpit also has old carpet adhesive on it. I ruled out sandblasting the car, mostly because I have no desire to chase hidden sand out of the thing for the rest of my life. And when it come time to paint it, the sand always shows up right when you spraying the body.


8-7-08
Went and got more parts from the Ex’s garage. I know there is some stuff missing.

8-8-09 to 8-15-08
In New Orleans on vacation. Too drunk on Bourbon street to think logically about the MG. Maybe that idea about converting it to a Speed Racer Mach-5 wasn’t such a bad one…

8-16-08
Assessing what parts I’ll need to finish this job. Have to replace everything on the car made of rubber. I just can’t find myself getting real excited about driving with 10+ year old belts and hoses, etc. Luckily, I had ordered many of the seals and gaskets I needed in the 1990’s so that should reduce some of the expenses. I also have friends who get wholesale pricing on parts…it’s who you know, not what. Great news, the brake hydraulics seem to be in good shape. There are no leaks anywhere. Probably because I used the DOT-5 silicone brake fluid instead of regular fluid. It does not hold moisture so there’s no rotting or rusting in the system. I’m still going to replace the seals but at least I don’t have to replace the master cylinder, rear brake cylinders or front calipers. The bad news is that there is a leak somewhere in the area of the tranny. It is either the always p.o.s. clutch slave cylinder or the rear tranny seal. Both of which I’ll replace anyway.

8-17-08
Now the fun begins. I’ve decided to strip the paint out of the trunk area. I have two cans of paint stripper, scrapers and wire brushes so here I go. There are four layers of paint and primer in there so I is scared.


8-18-08
Bought two more cans of stripper, this isn’t going well. I take off one layer and the one underneath it is untouched. Why the hell can’t the paint on the body stick this damned well?
And I was right; I’m missing parts from the ex’s garage. One interior door panel, the grill and a few other small parts are gone. She might have gone a bit crazy when she cleaned up after I left but she loved the car too and let me store it there for over two years so I guess I can’t bitch too much. But damnit, the grill was really nice and they cost so much to replace…


8-19-08
Finally, I’ve gotten the paint all stripped out (after seven cans of stripper!) and the good news it that the metal in the trunk is nearly perfect with only some minor surface rust and one area about the size of a pea with rust-through. All taken down to bare metal and primered now and it looks really good. I coated the insides of the rear fenders in the trunk behind the wheel arches with a layer of spray-on rubberized rust-proofing. That should help reduce the noise and hopefully seal it up more effectively.


After the cockpit and engine compartments are also cleaned, stripped and primered I’ll get back to the outer sill and dogleg replacements. Guess I’m finally gonna have to take the plunge and buy a MiG welder.


UPDATE:
I found a MiG welder for less than $120.00. It is only a 120-v/15-amp welder but that is fine for me since I don’t have a 220-v power outlet and the circuit in the garage is only 20-amps. Oooh, I want that plasma cutter too…and that spot welder…and that… I can see myself getting trouble really fast here.


8-21-2008
Finished the trunk area (except for the wheel arches) and got one coat of white paint over the primer. There will be more but the whole restoration will take several months and I wanted to get the metal and primer covered. The wheel arches have the flexible spray-on undercoating applied to them so I'm letting it and the primer sit for a while before I finish them.


8-22-2008
Started chipping out the factory floor sound-deadening material in the passenger side. It sucks! there has to be an easier way to get this asphalt tar paper stuff out. Guess not


8-23-2008
Finished taking the driver's side of the cockpit floorboard to bare metal. Got it cleaned and primered. The small rust-through areas are easier to see when everything is primered. I'm going to grind the primer back off those areas and put down a layer or two of fiberglass then seal it all back up afterwards.


Next comes the rear deck, passenger floorboards and all of the vertical cockpit metal.

Oh joy of joys, removing the dashboard...
that should be fun.
8-25-2008

So the paint stripping saga continues. The cockpit is more difficult than the trunk. Not only because it has more surface area but also because there are so many more complex curved pieces and weird angles...and little recesses...and hard to get to areas....and this bites the big wanker. (UK reference for all of our friends across the pond)


To add to the fun there is a layer of what appears to be tar-like rust or sound proofing material right above the factory paint (three paint layers down) and it is all over the aft cockpit area) I don’t know if this is factory applied (doubtful but very possible) but it is nor affected very much by paint stripper so I have to remove it mostly by good, old-fashioned scraping. The wire brush wheel on my drill makes the paint/tar stripping a bit easier but it is still time consuming.


SAFETY NOTE!!!!!!!!!!!!
I know that it is most likely that 95% of those reading this are guys…don’t get huffy oh those of the internal naughty bits variety, it is true.
And guys, we know how we are. The label on a product says “wear respirator when spraying” and we just hold our breath for a few seconds when we start and think that it is enough to protect us.
Or it says “use eye protection” and instead we just squint.

Yeah, I think I’m bullet proof too (Which I shouldn’t after I recently lost a nice chunk of my thumb and wound up in the hospital after the intake cover broke off my leaf blower and decided to try to eat my left hand)

Well here’s my tidbit for all of you to gnaw on: You know how wire wheel brushes on drills throw a bunch of debris around? Well they are also really, really good at throwing nice gobs of paint stripper directly into your eyeball. And by your eyeball I mean MY eyeball.

Luckily you (I) were able to flush out your (my) left eye and remove your (my) contact lens which, amazingly enough, MELTED! Let me repeat: MELTED!
Do I wear safety goggles now when I work on my car. Oh hell yes!

When I finish the rear deck of the cockpit I’ll be moving on to the transmission tunnel and then its back to chipping off the factory floor sound proofing material.
Don’t you wish you were me?


9-1-08
I got the rear deck, wheel arches and side panels done. It was a PITA. I ran into the undercoating that just didn’t like to come off. But I got a super heavy duty rotary wire brush, the kind used to knock concrete off of masonry. The wires are twisted and are thick enough that you can’t bend them easily and it cuts through the paint and undercoating very quickly. Once it was stripped I cleaned it all with acetone twice and then put down a coat of etching primer (you just need a light dusting of the stuff) and then a layer of regular primer over that when it dried . If you use this kind of wire wheel be careful with it because it can very quickly warp the thin sheet metal in the car. I would not recommend using it on outer body panels.
Next comes the passenger side floorboard, inner sill, the transmission tunnel and then the outboard sides of the foot wells and the firewall. Once those are stripped and primered I’m going to repair the floorboards with fiberglass.

9-2-08
With the trunk primered and with the undercoating all dried, I sprayed two coats of paint. I’m not really excited about using paint from a spray can but if you properly prep the area and use a good quality paint, the results are usually pretty decent. Plus, I needed to get the primered trunk metal covered. It is very humid here and with the string of hurricanes about to roll in here (and the buckets of rain that they bring with them) it is going to get even more humid. It isn’t perfect but that’s okay for now. I probably won’t be spraying the car for another 8 or 9 months so protecting it is more important for right now.

9-3-08
I’ve gotten the sound deadening material off of the passenger side floorboards. It was a bee-atch! I tried the heat gun method but it either didn’t work well for me or it turned the material into sticky goo. Instead, I went to the grocery store and bought a small block of dry ice (frozen carbon dioxide) I put it in a couple of plastic bags and an old pillow case and crushed it up with a hammer. I then put it on a section of the sound deadening material and let it sit there for about 10 minutes and then moved it and took out the old hammer and chisel. The dry ice is so cold that it hardens up the stuff and makes it really brittle. When struck by the chisel, the stuff just chipped off cleanly, sometimes in really big chunks. While I was working on one area I moved the bag of dry ice to another area and let is harden up that material. It was much easier than heating up the stuff with a heat gun and it all came off very quickly. (Alternate method: drag the car to northern Minnesota and wait for January)


Words of caution: Dry ice is frozen carbon dioxide and it is VERY, VERY COLD, in the area of 150-degrees below zero. Wear eye protection and heavy gloves and be very cautious when working with it because it will stick to your skin instantly and can cause tissue damage if stays in contact with your skin for too long. As a fun bonus though, when you are done with it you can throw what’s left in a pot of hot water and it will make that really cool ground-hugging fog that you see in scary movies.


9-4-08
The passenger floorboard is all stripped and clean. I'm applying a light coat of etching primer followed by the regular primer. The rust on the floorboard isn’t too bad but it is muchh worse than the driver's side.


A few small holes which will be pretty easy to fix with fiberglass. I’ll glass the passenger and driver side floorboards at the same time but before I do that I have to strip down the transmission tunnel and get it all pretty and primered. I’m also going to clean up as much of the inner firewall as I can reach and also strip down the inner outboard foot wells.

Then comes the really fun part…the removal of the dashboard. I’ve never done that before from all I’ve heard it is not very easy. But it has to be done so, once more into the breach my dear friends (for those of you who are into Shakespeare.)

Short and long term plan for the restoration:
After I get the dash out and finish up the cockpit I’m going to start cleaning up the engine bay. I’ll be pulling the radiator and it’s support shroud, the oil cooler and heater box. When those are out I’ll be pulling all of the various little doo-dads from the inner fender wells, degreasing and stripping down the paint and then spraying a few good layers of primer and paint.
I’ll also be cleaning the engine and repainting it with high temp paint after I strip off all of the ancillary components which will also get cleaned up and tested for functionality. At that point I’ll start on cleaning up the wiring. I’ll be pulling apart each bullet connector and cleaning them out then applying a conductive grease to them. I’ll also strip off all of the old electrical tape of the wiring harnesses and recover them with the correct blue-colored tape.

Then I’ll start on cleaning up, undercoating and sealing up the underside of the car. Also, at any give point in this process I’ll be doing the welding and replacement of the rocker panels, doglegs and other rusted out parts. That is dependant on when I have the extra funds to buy a mig welder.

After that is all done I’ll start the reassembly process and prepare to get all of the other little things finished that I have in order to get the engine up and running again. It will be nice to hear that little 4-cylinder engine fire up again after 10 years and to be able to move the car around under her own power. I imagine that after 10 years the clutch will be frozen to the pressure plate so the car will have to be running to break it free. I’ll also have to get the radiator flushed and pressure tested and the fuel tank flushed and sealed (or replaced) along with about a thousand other little things. That will happen later in the year towards the winter months as I don’t want to be working on the body in my unheated garage when its cold outside!