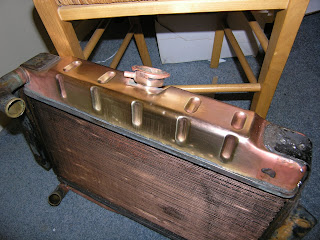
results are pretty dramatic. The first picture is of the radiator as it was before this restoration began. It wan't too bad looking, just dirty and tired.

The next is a picture of the radiator and core soaking in the hot bath of CLR and water. I soaked it for about 3 days and the amount of crud that came out was amazing!

I took a hunk of super-fine steel wool to the the radiator top for only about 20 seconds and it shined up like it was brand new! I still have to fiinish cleaing off the old paint from the radiator support, painting it and then cleaning up the rest of the brass but that is all just a detail.

I soldered the crack in the heater core and then soldered the upper part of the radiator support bracket back onto the passenger side radiator top.

How I did it:
I took the core and used a wire wheel brush to take the area all around the crack to bare clean metal. The wire wheel expanded the damage from nearly invisible to a 1-inch long opening around 1/2 to 1 mm wide. I smeared solder flux all around the area and heated it with a propane torch until it was very hot. I then dipped the solder into the flux and onto the crack and the solder was sucked right in like it is when you are soldering copper pipes together.
I built up the solder on top of that and then all around it to the sides and it seem pretty solid. I hooked a garden hose to one end of the core and blocked the other opening and turned on the hose...no leaks.
Since the pressure from a home's plumbing system is much higher than that which the core will experience in the car I think I am safe to assume that this will hold over time.
I'm very lucky the pressure didn't blow the core apart but the solder held so I think it'll be okay to install back in the heater box.
No comments:
Post a Comment